Content last reviewed
Step 1: Match the chart to how the crane is set up
A single crane carries many charts, each tied to a configuration. Before looking at any number, confirm that the chart heading matches reality:
- Outriggers fully extended, partially extended, retracted, or working on rubber (tires).
- Counterweight installed, in pounds or by configuration code.
- Area of operation: over the rear, over the side, 360 degrees, or over the front where permitted.
- Main boom only, or with a jib or extension erected, and at what offset.
- Number of parts of line reeved on the hook block.
Step 2: Find the radius and boom length
Load radius is the horizontal distance from the crane's centerline of rotation to the center of gravity of the hanging load, not to the edge of the crane or the outrigger pad. It grows as the boom lowers and as a loaded boom deflects, so a pick that starts at one radius can end at a longer one. Measure it, or read it from a calibrated rated capacity indicator, rather than estimating it by eye.
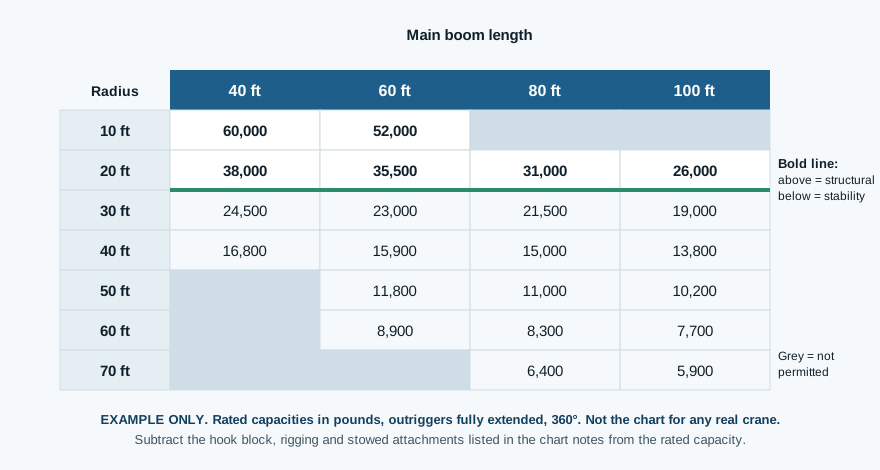
Find the row for your radius and the column for your boom length. If your exact value is not listed, most charts tell you to use the next longer radius or next longer boom length rather than averaging between two numbers. The notes section of your chart says how; follow it.
Step 3: Subtract everything under the boom tip
The capacity printed in the chart is gross. Before comparing it to the load, add up everything that hangs from or rides on the boom besides the load itself. Typical deductions include the hook block or overhaul ball, slings, shackles and spreader bars, and, on many cranes, a stowed or erected jib. The chart notes list what the manufacturer requires you to deduct.
For example, on a made-up chart showing 10,000 pounds at your radius, a 400-pound hook block and 150 pounds of rigging leave 9,450 pounds for the load. Those numbers are invented for illustration; the arithmetic is the point.
Step 4: Know whether strength or tipping is the limit
Charts typically separate capacities limited by structural strength from those limited by stability. Close in, the boom, pins and outriggers are the weak point and the crane can fail structurally without warning. Farther out, the crane tips before anything breaks. Manufacturers mark the boundary with shading, a bold line or a note. The practical lesson: near the structural limit, a crane may give you no feeling of lightness before something fails, so never use tipping feel as a capacity check.
Also look at the range diagram, which shows the arc of the boom tip at each boom length and angle. It answers whether the hook can physically reach the landing point and how high it will be when it gets there.
What the chart assumes about Alaska ground and weather
Every chart assumes the crane is level and on ground firm enough to carry the outrigger loads. Alaska challenges that assumption more than most places. Frozen ground can feel like pavement in February and turn soft during breakup; permafrost in places like Bethel or Kotzebue can lose strength when disturbed or thawed. Use mats or cribbing sized for the outrigger loads, and check level again during long jobs as conditions change.
Charts also carry wind limits and notes about load surface area. A panel or a module with a big sail area behaves differently from a compact steel load in a gap wind funneling through a mountain pass or on an open Bering Sea dock. Check the manufacturer's wind guidance, and read the cold-weather guide for how cold affects steel, hydraulics and wire rope.
Land cranes on barges: a different calculation
In coastal and river Alaska, cranes routinely work off barges, delivering materials to villages without docks or driving piles along a waterfront. A standard land chart assumes a stable, level base; a barge lists and trims as the load moves. Federal rule 29 CFR 1926.1437 adds requirements for land cranes on barges, including a list-and-trim indicator at the operator's station and compliance with all chart parameters and limitations for that setup. Expect usable capacity on a barge to be lower than the land chart shows, and work only from a chart and parameters approved for the floating setup. Work on navigable waters is generally under federal OSHA rather than AKOSH.
Questions people ask
Can I use the load chart from the operator's manual instead of the one in the cab?
The chart that counts is the one specific to that crane and its serial number, and the federal rule requires load charts to be readily available in the cab. Manuals sometimes include charts for multiple configurations or models, so make sure you are reading the one for your machine.
What if the crane's rated capacity indicator disagrees with my chart math?
Stop and find out why before lifting. Common causes are the wrong configuration entered into the system, an incorrect parts-of-line setting or a misjudged load weight. The written chart and the indicator should agree when everything is set correctly.
Are load chart questions on the NCCCO exams?
Yes. The specialty written exams lean heavily on chart reading, including radius, deductions and configuration questions. Practicing with several different chart layouts is one of the best ways to prepare; see our online written exam guide.
Does parts of line affect capacity?
It can. Each part of line can carry only so much, so a hook reeved with too few parts may limit the lift below the chart value. Charts usually include a line-pull or parts-of-line table for this check.
Why does capacity drop so fast as radius grows?
Because tipping depends on leverage: the farther the load sits from the center of rotation, the greater its overturning effect. In the stability-limited part of the chart, a few extra feet of radius can take a large bite out of capacity.